
Soft Playground Flooring is more than just a surface beneath swings and slides; it’s the foundation of safety, fun, and peace of mind for parents and caregivers. When children run, jump, and explore play equipment, the right flooring helps prevent injuries while creating a comfortable and visually appealing outdoor play area. But installing safety surfacing doesn’t need to be complicated. With the right guidance, you can transform any space into a safe and enjoyable environment for kids.
This guide walks you through the step-by-step process of installing playground surfacing, whether you’re working on a small backyard play zone or a community playground that faces heavy foot traffic. From preparation to maintenance, you’ll learn how to achieve a durable, eco-friendly, and kids-safe flooring option that meets safety standards and lasts for the long term.
Step 1: Preparing the Playground Area
Every successful installation begins with preparation. Before bringing in materials like playground rubber tiles or rubber playground flooring, it’s essential to assess the site carefully.
Start by clearing the designated area of debris, grass, or old surfacing options such as artificial grass or worn-out rubber surfacing. Make sure the ground is level, as uneven surfaces can create tripping hazards or cause gaps in the floor surface later.
Think of this stage as building a strong foundation not just for the flooring but for children’s safety. The effort you put into preparation directly affects how well your playground surfacing will perform over time.
If you’re working in outdoor play areas, consider drainage. Standing water not only shortens the lifespan of your flooring option but also makes the play zone slippery. Good preparation ensures your DIY playground surface setup will be easy to clean and maintain.
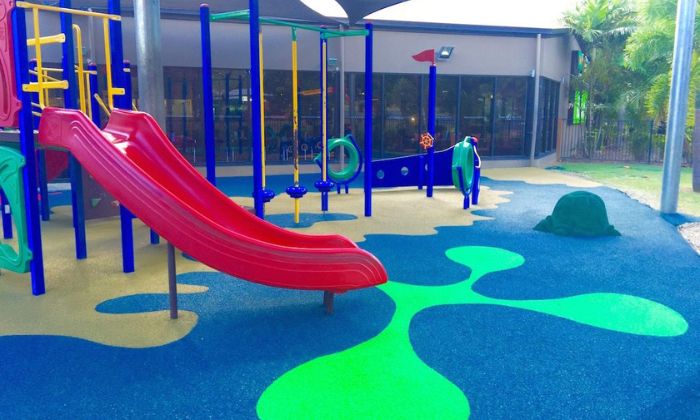
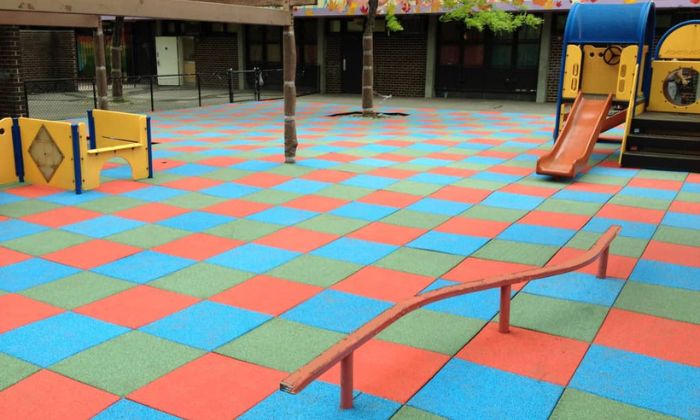
Step 2: Choosing the Right Soft Playground Flooring
Not all playground surfacing is created equal. The type of playground floor you choose should match the needs of your play equipment, your budget, and most importantly the safety of children.
Here are the most popular surfacing options:
- Playground Rubber Tiles: Durable, shock-absorbing flooring for kids, ideal for spaces with heavy foot traffic. They provide excellent fall protection and are easy to replace if damaged.
- Wet Pour Rubber Surfacing: A seamless solution that looks sleek and offers high safety standards, particularly for play areas with varied shapes and designs.
- Artificial Grass: A natural-looking choice that adds beauty while still meeting safety surfacing requirements when paired with proper shock pads.
- Playground Rubber Mats: Simple to install and a popular DIY playground surface setup option for small areas.
When choosing, think about the critical fall height of your play equipment, the maximum height a child might fall from. Your chosen flooring must meet this standard to ensure the area is truly kids-safe.
And don’t overlook aesthetics. Flooring should not only protect but also complement the design of outdoor play areas, making them inviting and exciting for children.
Step 3: Laying the Base Layer
Just like a house needs a strong foundation, playground rubber flooring requires a sturdy base to perform effectively. This stage ensures your floor surface stays even, stable, and safe for the long term.
A common method is using compacted crushed stone or gravel as the base. This allows for proper drainage while giving stability to the top surfacing. Spread the material evenly across the area, ensuring it’s level and firm.
If you’re opting for wet pour or rubber surfacing, a solid concrete or tarmac base may be necessary. Always check manufacturer guidelines for the flooring option you’ve chosen to ensure compatibility.
Step 4: Installing the Soft Flooring
Now comes the exciting part bringing your playground surfacing to life.
For playground rubber tiles, begin at one corner of the prepared area. Interlock the tiles carefully, checking alignment as you move forward. Rubber playground flooring is flexible, so it adjusts well, but precision during installation ensures a smooth and professional look.
If you’re using wet pour, the mixture of rubber granules and binder is poured onto the base and spread evenly. This method creates a seamless, slip-resistant finish that’s both durable and easy to clean.
With artificial grass, roll out the turf and secure it with adhesives or pegs. Don’t forget to add shock pads underneath to provide the safety surfacing children need.
No matter the type of playground floor, patience here pays off. Smooth, even installation ensures there are no weak points, keeping the flooring kids-safe for years to come.
Step 5: Securing and Finishing the Surface
After installation, it’s time to secure the flooring to withstand daily use and weather conditions. For rubber playground mats or tiles, adhesives or edge restraints help keep them firmly in place. This prevents shifting under heavy foot traffic and ensures that seams don’t open up.
Finish by inspecting the entire floor surface. Run your hand along the joins and edges, making sure everything feels smooth and solid. A properly secured playground surfacing not only meets safety standards but also saves you from costly repairs in the future.
Step 6: Safety Checks and Maintenance Tips
Installing shock-absorbing flooring for kids is only half the job. Ongoing safety checks and maintenance ensure your playground remains a secure place for play.
Regularly inspect the surfacing for wear, especially in high-traffic zones near swings, slides, and climbing structures. If you’re using rubber surfacing, check for cracks or gaps. Playground rubber tiles that become loose should be replaced immediately to maintain critical fall height protection.
Cleaning is also essential. Choose flooring that is easy to clean such as rubber playground flooring or artificial grass with proper drainage. A quick wash keeps the play area looking fresh and hygienic.
Over time, even the best flooring option may show signs of wear. But with the right care, your soft playground flooring can remain safe and eco-friendly for the long term.
Common Mistakes to Avoid
When installing playground surfacing, a few missteps can lead to problems down the line:
- Skipping Site Preparation: Uneven or poorly drained bases cause flooring to shift, wear faster, and fail safety standards.
- Choosing the Wrong Flooring Option: Not all surfacing options suit every play area. Always match the flooring type with the play equipment and expected foot traffic.
- Ignoring Safety Standards: Forgetting to check the critical fall height can put children at risk. Always prioritize kids safe surfing.
- Poor Installation: Gaps, uneven seams, or improper adhesives can shorten the lifespan of your surfacing and increase maintenance costs.
- Neglecting Maintenance: Even durable rubber surfacing needs regular checks to stay in top condition.
Avoiding these mistakes ensures your flooring investment delivers safety and fun for years to come.
Conclusion
Creating a safe and inviting play space doesn’t have to be overwhelming. With proper planning, the right materials, and careful installation, you can achieve a professional-quality playground surfacing that meets safety standards and delights children.
From clearing the area and laying a strong base, to securing the final surface and maintaining it for the long term, each step plays a vital role. Whether you choose playground rubber tiles, wet pour surfacing, artificial grass, or rubber playground mats, the ultimate goal is the same: providing a kids-safe, durable, and eco-friendly flooring option.